| |
My Segmentation Work |
|
| |
| |
Sometimes it can be difficult to move on to new things. For several years I have wanted to explore the world of segmented forms, but it seemed to be such a complicated process and a distant wish.
Late in 2014 I decided to do a newsletter article for Norwich Woodturners, thinking it would give me a better insight into the necessary process chain, and also, would help to ignite the fire and get me started.
Since that time, many project files have been created relating to segmentation. See them all here.
What I did not expect was that a good deal of what I had previously seen and heard would be re-worked some other way.
This has absolutely nothing to do with my ways being better than others, it is simply a case of the methods I am now using are for me, much more attainable.
|
|
| |
| |

Here are a couple of examples of what I have created so far.
I am very pleased with them.
|
|
| |
| |

My achievements so far have led to the creation of an Excel spreadsheet.
Having drawn the profile of a bowl I would like to make, I can then draw in the segmentation layer lines and measure the maximum and minimum dimensions on each layer.
I was quite a long way into the learning process when I realised that the segmentation layer lines are totally dependant upon the thickness of the wood you are going to use if you do not have a planer. BEWARE: This may well have an influence on your original bowl design.
When you put the measurements into the spreadsheet, it gives you all the cutting dimensions you need to make the bowl you have designed.
Feel free to download a copy of the segmentation tool
from my projects directory.
|
|
| |
| |
| |
| |
The next area for me to explore is open segmentation. This led me to update the spreadsheet tool so that any layer can be nominated as "An Open Layer", and segment lengths in the cutting list are then adjusted accordingly.
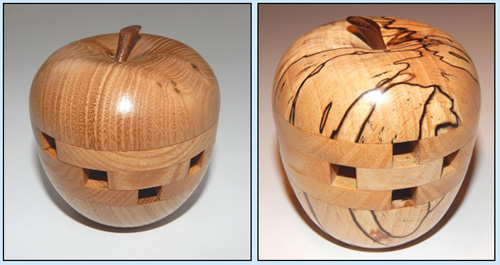
One day I was looking at the web site belonging to Sue Harker and I saw an apple with segmented layers. I decided to explore the form (with a few style changes).
|
|
| |
| |
Having made a prototype, I took it out one evening to show some friends and I sold it within an hour.
Clearly, this could turn out to be an item capable of generating a lot of interest at the craft fairs I do and needs to be explored a good deal further.
|
|
| |
Now that I have made a few more of these apples (with differing segmentation patterns), I was surprised to find that most people asked if they could be opened to insert smelly bits (the nice sort).
Having thought about it, I found a supply of plastic bungs (the sort you put in the bottom of a salt seller), and I drilled out the base of the apple to accomodate the bung. This allows potpourri or cotton wool with scented oil to be inserted.
Project files relating to the methods I now use to make apples can be looked at here.
|
|
| |
To do segmentation work it is necessary to make use of accurate tooling, and for what I have done so far, this is what I have learned, and had to acquire. Please Note: I do not have a planer/thicknesser. Timber preparation is all sorted out for me via a local timber mill and a friend down the road who runs a woodworking business.
|
|
| |

Make sure your bandsaw is cutting at right angles to the table. To test it, cut into a piece of timber, turn the timber round and check that the back of the blade aligns correctly with the slot you have cut.
If not, correct the saw table alignment.
|
|
| |

A digital angle finder/protractor was purchased from a well known internet auction site.
It only cost me #15 with free postage and has been a god-send.
|
|
| |

You need a good bench sander. This model has variable speed and allows you to do fine, gentle sanding, ideal.
Take time to ensure it sands a good right angle onto a piece of timber.
This is NOT the same as setting the table at right angles to the disc.
It is important that the table is fully supported at both ends
and that it can be adjusted to a VERY fine tolerance.
|
|
| |

I invented the spider board so that I could build segment rings on the flat.
The big advantage here is that you can build rings with an odd number of segments.
The board consists of no more than a scrap end of kitchen worktop and dozen or so tent pegs, slightly shortened and bent over to just deyond a right angle.
When pressed into a pre-drilled hole they act as a very effective hold-down clamp for each of the segments.
Here you see a segment ring being built and glued on top of the board using cling film as a seperator. I have since found that tin foil works just as well, and it is a lot easier to work with.
Right from the start of this venture I saw working with an even number of segments as a limitation I was not prepared to accept.
|
|
| |
| |

This part of my story ends with the fact that I have been commissioned to make a segmented bowl for the local vicar who is leaving the Parish of Ludham in May 2016.
John Stride has been a good friend since we moved here, and I am both pleased and proud to do this job for the local PCC.
A segmented and spiralled bowl was required, and it needed to have a couple of inscriprions on it.
Pyrography is not one of my abilities, I send all the "embelishment" work out to a clever lass in Bury St. Edmunds. My friend Katie Noorlander does an excellent job at a reasonable rate, and the results of our combined efforts are shown here.
|
|
| |
| |
 |
|
 |
|
| |
| |
The next thing I want to explore is real open segment work, built up as part of a bowl. I have a few projects stacking up and waiting, they will all hang on until the new lathe is up and running, then I think I hear the call of a segmented bowl. |
|
| |

So, here are the results of that distant call. An open segment bowl made of Cherry and Sycamore.
For those who are technically minded, it is 250mm diameter with 9 layers of 12.5mm timber, 8 segments per layer, all assembled with a 33% twist and 9.5 degree openings.
For those who are not so technical, it looks nice, and I am very pleased with the result. It took nearly a week to cut and assemble, and a morning to turn.
It is sealed with cellulose sanding sealer and polished with Simoniz car wax.
|
|
| |
| |
| |
 |
|
 |
|
| | | | | |
| |
 |
|
Here we see an item which was produced for the AGM Competition at my woodturning club (Broadland Woodturners). The subject was to be any sort of lidded box.
In all my years of woodturning I have made very few boxes, and I don't know why that is. It took a good deal of time for me to come up with the design of this piece, and more importantly, how best to construct and finish it.
|
|
| |
None were more surprised than me at the result of the competition, I won, in the face of some very skilled and creative competitors. It has been said many times, it is not the best piece that wins, it is the piece that most appeals to the judge on the night.
All of the competition pieces and prizes were donated to "Help for Heros".
|
|
| |

2018 brought me some new adventures. Quite out of the blue, I was asked if I could make a banjo hoop.
When it was explained to me what the hoop actually consisted of I said "Yes". That was mid August, whereupon I was promptly asked, "can you make one before the end of the month please?".
Those that know me well will already know what my answer was, "Yes, I'll give it a go".
The next bit still makes me laugh. "Oh, and we want you to make two a month".
Its a funny old world for sure.
|
|
| |

The hoops you see here are 12 inch diameter with Ebony top and bottom rings and 3 layers of Mahogany in the centre.
From start to finish, I can build, turn and finish 2 hoops in 3 days, spread over about 6 days to allow for drying time.
Anybody that thinks retired life is easy is just not trying.
|
|
| |

When Bron and I were in Australia in September 2018, we made several visits to 'Aspects of Kings Park' in Perth, WA.
This is a high class gallery displaying the art and culture of Australia.
While there, I took this photo of some glassware produced by Hamish Donaldson, being marketed under the name 'Sloopy'.
After a 4 year carpentry apprenticeship, and part time glassblowing, Hamish is now blowing glass full time with his parents Eileen Gordon and Grant Donaldson of Gordon Studio Glassblowers. The forms produced by Hamish are free-style and elegant, and he is now making glass incorporating engraving.
Put simply, I was captivated by the pieces on show, and vowed to reproduce some of their characteristics in wood when I was back in my own workshop.
|
|
| |

Well, I have now found the time to do a few experiments. My first attempt was horrible, and I am not prepared to show it. I will keep it however, because it serves as a good reminder of what not to do.
My second attempt is shown here, a Sycamore piece which I am very pleased with, and I have decided to name it 'Bottle Neck'. It is 3 inches diameter at the base, 9 inches tall at the shoulder and 16 inches tall overall.
I think there will be several more trials in the future aimed at exploring what the factors are that control the rolling and twisting movements.
|
|
| |
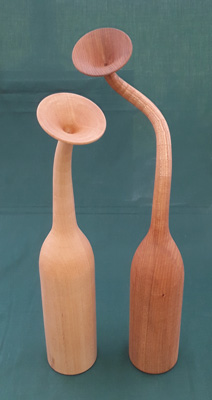
Another offering in the "Bottle Neck" series.
This project has given me a fascinating insite into the world of segmentation and art, and at the same time I have learned some interesting facts about how to control the direction of flow.
Once again I mention the work produced by Hamish Donaldson in Australia. Without the insperation his work gave me, my pieces would not have been produced.
Download the bendy bottle project file here.
|
|
| |

A final offering in the series (unless someone wants to buy 1 or 2 pieces).
This pair, made of Spalted Beech and Yew, stand no more than 6" from the base to the start of the neck section, and are about 10" tall overall. It has surprised me to find out that I can now build a bottle in about 90 minutes, and after the glue is dry, I can finish it within an additional hour.
These have been interesting projects to experiment with. If you would like to find out more about how they are made, please do get in touch.
|
|
| | | | | |

