| |
Several Replacement Knife Handles Have Also Been Made ....
|
|
| |
The "Pan Handle" story started back in 2011, when I was asked "Can you make me a couple of these"? At the time I had no idea how many handles I would finish up making.
Please Note: These handles SHOULD NOT be considered water or dish washer proof. Prolonged exposure to water WILL result in damage occurring.
I use a variety of timbers to make replacement handles, often English Oak and Ash, but I regularly have Mahogany and Iroko in stock (African and American hardwoods). These materials are hard wearing and burn resistant, and are "Fit For Purpose".
Normally I use the timber I have available when an order is placed, and unless otherwise specified, all handles are supplied sealed and varnished without any additional colour.
Nothing is ever kept in stock, all my handles, lid knobs and fittings are made to order, normally, with a very quick turn-around. Other materials can been used, but often, they are subject to additional charges. Also, if additional work is required (or if fittings need to be replaced), the customer is ALWAYS advised up front. |
|
| |
| |
| |
Knife Handles |
|
|
|
| |
| |
 |
|
One day my ever-suffering wife asked, "Can you do anything with this".
What she showed me was an old-fashioned knife with a bone handle. Clearly, the knife had been in the dish washer about 1000 times too many.
|
|
| |
| |
As can be seen here, a valued heirloom has been given a whole new life, using a piece of Brazilian Ebony.
The piece has been given an oil finish, which can be re-newed with ease, as and when required |
|
 |
|
| |
| |
 |
|
A photo of a complete job to be worked on.
In the foreground you see 3 knives. Each has a phenolic handle which is both broken and loose. |
|
| |
| |
Here you see the same 3 knives after a small number of hours attention.
They have all received a new Oak handle, held in place with Mahogany dowels. |
|
 |
|
| |
| |
 |
|
As per the set of 3 shown above, a bread knife was also included in the job, and was given the same treatment.
It has new Oak handle sides, held together with Mahogany dowels. |
|
| |
| |
| |
| |
A well-worn set of fish knives and forks |
|
|
|
| |
An interesting request came in, asking if I could resurect a set of fish knives and forks. At first glance, they looked to be well past their sell by date, but then what would life be without the odd challenge to address. Below you see before and after pictures, and I leave Sarah Isaacs to tell the rest of the tail. |
|
| |
| |
 |
|
Sarah says: I had been randomly looking on the internet for someone who could fix my bone handled cutlery. I say fix, the bone had splintered, broken and flaked, so the idea of trying to 'fix' them was just futile. I spotted 'Wood Be Nice' and thought I'd make contact. Perhaps I could have wooden handles and after all, no one could possibly make the cutlery any worse!
I was beyond pleased! Not only was the communication exceptional with Jon, but he fitted one of the pieces with a new handle just to see how it looked and to see if I liked it. It was amazing. The American Black Walnut handles complete with glaze looked even better than the bone ones did before they disintegrated. I was able to use the cutlery once again. |
|
| |
| |
 |
|
 |
|
| |
| |

The craftsmanship was nothing short of miraculous. Not only were the pieces functional again, but they also retained the essence of their era, a testament to the skill and dedication of this incredible craftsman.
It is rare to find someone who not only excels in their trade but does so with a profound respect for the items.
To conclude, if you're on the fence about entrusting your cherished items to someone you've just discovered, let this be a testament to the remarkable things that can happen when you take that leap of faith. The exceptional service, coupled with the unmatched skill in restoration, has resulted in an amazing set of cutlery.
Sarah Isaacs, April 2024.
|
|
| |
| |
| |
How Do I Make A Replacement Knife Handle ? |
|
|
|
| |
In January 2025 I was contacted by Lizzie Watson. She was asking if I could replace the handles on a pair of kitchen knives. Naturally, my answer was yes.
A few days later the knives arrived in the post. No problems were envisaged with the job so I decided to do a full report on the repairs I was going to make. Any future customers would then see what is actually involved in this sort of work. |
|
| |
| |
 |
|
Lizzie says: I did a google search for replacement knife handles and the only person selling handles for that shape was on Ebay and from China, and delivery would not be until the end of March!
I carried on through the listings and found Jon's website, and was delighted to find someone that would make them bespoke at a reasonable price. The website detailed everything I needed to know, and I was very pleased at the quick reponse.
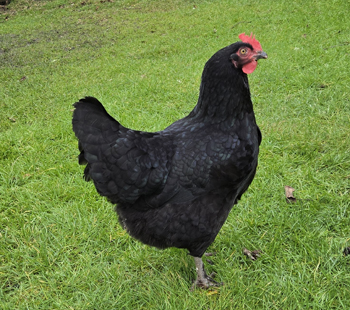
Jon did ask for my picture to go with this report but I didn't want that, so we agreed that we would show one of my chickens instead, so here we see 'Olivia'. |
|
| |
| |
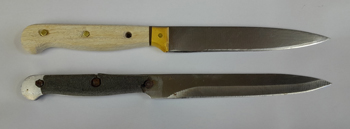
Jon says: Pictured here are the two knives that came from Lizzie.
Both handles were broken and loose. and were definately in need of a good repair job. |
|
 |
|
| |
| |
 |
|
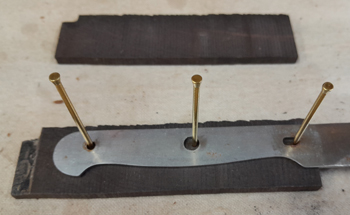
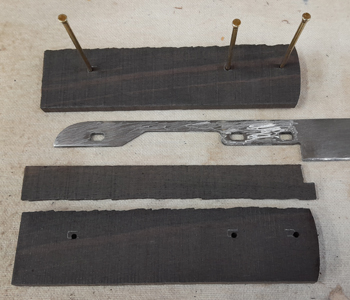
A piece of Ebony was cut length-wise to give me two pieces, each plenty long enough, and about 6mm thick.
The knives were stripped and cleaned. One little surprise was that the handle of the larger blade was only half-height so a lower packing piece would also be needed (the same thickness as the blade) to fill the gap.
Here we see all the pieces, ready to be assembled. |
|
| |
| |
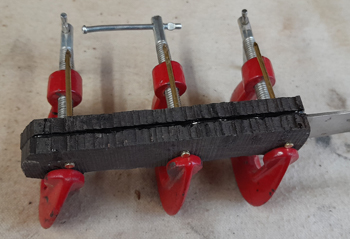
With jobs like this, it is most important that you cut pieces of timber equally from each blank. This ensures that the grain will always match on both sides of the handle when completed.
One side has been drilled to take VERY THICK brass pins. The brass pins can then be used to transfer punch the hole locations onto the second side. |
|
 |
|
| |
| |
 |
|
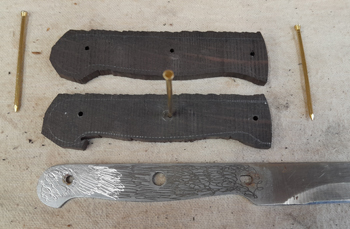
All the pieces for the first blade are now ready.
Two blanks have been drilled and cut to a rough shape. This will reduce how much timber will need to be removed during the final finishing process.
The surface of the blade handle has been roughened with a diamond drill. This will give the 2 part epoxy something to grip onto. |
|
| |
| |
All glued up, time for a cuppa. |
|
 |
|
| |
| |
 |
|
All the pieces for the second blade are now ready, including the extra in-fill piece to fit along the bottom edge of the blade handle.
As can be seen, the surface of the blade handle has been roughened to provide a key for the epoxy resin.
The two blanks have been drilled ready but there is no pre-shaping this time. After the resin is set, I will draw round the old handle and then remove a lot of the waste on the bandsaw.
From here, the process is the same as the first handle, glue it all together with 2 part epoxy and sand the outline to match the profile of the blade. |
|
| |
| |
Please Note: Knives like this should NEVER be put in a dishwasher, and in reality, I recommend that you simply wipe the blade after use.
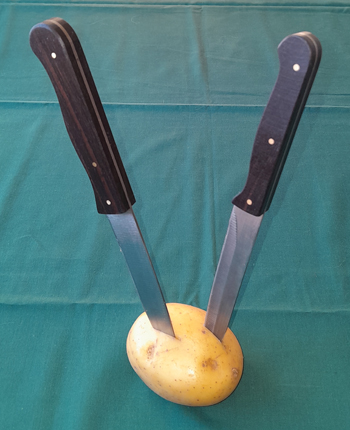
Both knives are now finished, several coats of sanding sealer have been applied, and they are ready to return to Lizzie, I hope she likes them.
Lizzie says:
I have now received my knives back from Jon, and I just have to say how fantastic they are, and so beautifully crafted. Thank you very much.
The whole process, from initial enquiry, right through to their return was so quick and easy, I had the knives back within just a few days with beautiful new Ebony handles. I can whole-heartedly recommend the services that Jon provides.
I do have a couple more knives that need refurbishing, so I will be sending those to Jon also. |
|
 |
|
| |

